Showing posts with label Blogger Widget. Show all posts

How to add Google progress scrollbar on top of your BlogSpot page in 2020 New Templates?

How to add Google progress scrollbar on top of your BlogSpot page in 2020 New Templates? 


You may have seen a progress bar in various Google product site’s pages that when scroll through the page then a horizontal progress color bar is rolling from left to right side on top of the page. This progress line is indicating your position only from the total page height.

However this feature is not very important for blogger platform users but if you would like to extend the prettiness of your blogger theme then adding this feature in your blogger theme would be a perfect choice. I have developed this custom feature to make it compatible with blogger platform. When visitors will visit your blog pages then this Custom module Progress Scrollbar will display the length of your blog pages through a horizontal color bar.

Generally, this features works by measuring page height. Suppose, you scrolled 25% of the blog page then a horizontal colored line or progress bar would be filled by 25% on top of the page. This is pretty interesting and useful for beautifying the webpage. If you scroll more proportion of the page, then horizontal colored line and length of the line will extend along it where the page is rolled.

How to Install Progress Scrollbar on Blogger?

So using this feature in Blogger page would be amazing. This features simultaneously works on Blogger home page and post pages. Moreover, it is compatible with almost all major browsers. Once you apply this feature in your blogger theme then it will work on both Desktop, Tablet and Smartphone.

Let’s proceed to the Google progress bar installation process

Step #1: Login to your Blogger BlogSpot account and if you are running multiple blog then select the appropriate Blog to install the Google progress bar feature.

Step #2: Now go to the Blogger dashboard

Step #3: Select Themetab and Click Edit HTM button

How to add Google progress scrollbar on top of your BlogSpot page?

Step #4: Find the closing ]]></b:skin> by pressing Ctrl+F (Windows) or CMD+F (Mac) and copy the below CSS script and paste it above closing ]]></b:skin>


For Solid color scrollbar please use this CSS code block
#scrollbar {height: 3px; left: 0; overflow: hidden; position: fixed; top: 0; width: 0; z-index: 9999;}
#scrollbar-bg {animation: 1s ease 0s normal none infinite running Gradient; background-color:#1dbf73; height: 100%; left: 0; position: absolute; top: 0; width: 100%;}

Customization

  • To change the scrollbar colors please alter the #1dbf73 code from above script. Please use our color picker and Flat UI color page to get the color code.
How to add Google progress scrollbar on top of your BlogSpot page?

For Gradient color scrollbar please use this CSS code block
#scrollbar {height: 3px; left: 0; overflow: hidden; position: fixed; top: 0; width: 0; z-index: 9999;} #scrollbar-bg {animation: 1s ease 0s normal none infinite running Gradient; background: rgba(0, 0, 0, 0) linear-gradient(-50deg, #ea3a7e, #20aadb, #23e0b3) repeat scroll 0 0; height: 100%; left: 0; position: absolute; top: 0; width: 100%;} Step #5: Again search <body> and above this opening body add the below HTML script.
<div id='scrollbar'><div id='scrollbar-bg'></div></div>

Customization

  • To change the scrollbar colors please alter these #ea3a7e, #20aadb, #23e0b3 colors. You can use our color picker and Flat UI color page to get the color code.
Step #6: Again search </body> and above this closing body add the below JavaScript.
<script type='text/javascript'>
//<![CDATA[
// Google Progress Scrollbar by https://www.bloggerspice.com/ $(function(){$('.post-body').readingTime();});var bar_bg=document.getElementById("scrollbar-bg"),body=document.body,html=document.documentElement;bar_bg.style.minWidth=document.width+"px";document.getElementsByTagName("body")[0].onresize=function(){bar_bg.style.minWidth=document.width+"px"} window.onscroll=function(){var bar=document.getElementById("scrollbar"),dw=document.documentElement.clientWidth,dh=Math.max(body.scrollHeight,body.offsetHeight,html.clientHeight,html.scrollHeight,html.offsetHeight),wh=window.innerHeight,pos=pageYOffset||(document.documentElement.clientHeight?document.documentElement.scrollTop:document.body.scrollTop),bw=((pos/(dh-wh))*100);bar.style.width=bw+"%"} $(document).ready(function(){var body=$('.post-body').first();var container=$(body).parent();var image=$(body).find('img').first();var surround=$(image).parent();$(surround).prependTo(container)})if(limit<windowTop){var diff=limit-windowTop;el.css({top:diff})}})}}) $(function(){if($('#rightbottom').length){var el=$('#rightbottom');var stickyTop=$('#rightbottom').offset().top;var stickyHeight=$('#rightbottom').height();$(window).scroll(function(){var limit=$('.inshare, .inshare-shop').offset().top-stickyHeight-15;var windowTop=$(window).scrollTop();if(stickyTop<windowTop){el.css({position:'fixed',top:50})}else{el.css('position','static')}//]]></script>

Step #7: Finally hit the Save theme button to save your progress.

Now visit your blogger page and scroll to see the beautiful horizontal progress bar. I hope you will love this new feature in your blogger theme.

How to Add Animated Responsive Sitemap in Blogger Site?

Do you want to show all your blog contents at a glance to your blog visitors’? 

Then Sitemap or table of content widget will work like magic in your blog. If you are using a responsive theme, then usual non-responsive sitemap will not work properly with your blog site rather I am recommending you use a responsive sitemap. 

Responsive sitemap or table of content will be a good option for your responsive blogger theme. Your blog visitors will get a user-friendly experience with responsive sitemap widget or gadget. 

Sitemap or table of content is highly recommended for any website to show all the content you have at once. So, visitors can easily visit your new and old content easily. This will help you to increase your blog page views and generate more leads. 

Before that you should know what, a sitemap is. 

What is Sitemap or Table of Content? 

Generally, a sitemap is a list of all content of a Blog or website. Blogger doesn’t have this feature by default, so you need to rely on any third-party widget from developer. Sitemap also known as “Table of Content”, because visitors will able to see all the content within a table or box. 

How To Create A Responsive and Stylish HTML Sitemap Page In Blogger

Benefits of using Sitemap Widget. 

There are many benefits you will get by using sitemap in your blog. Among them those are most effective. 
  • Your Blog visitors can see all the content at once. 
  • Readers can visit contents by categories. 
  • This widget will help to navigate easily from sitemap to the blog post directly. 
  • Sitemap or Table of content helps to increase pageviews. 
  • It will decrease the bounce rate. 
  • Your blog page rank will be higher. 
  • You can generate more leads through the sitemap 
  • Overall your Blog earnings will increase. 

How To Create A Responsive and Stylish HTML Sitemap Page In Blogger? 

It goes without say that sitemap has many advantages. So now I will show you how to add a responsive animated sitemap in your blog site. I said this is animated because the background colour of the sitemap will randomly change. So, this will really attract your visitors. 

Let’s see how to add this beautiful sitemap in your blog.

How to create a sitemap on Blogger

Step #1: Login to your Blogger account and visit the Dashboard 

Step #2: From Blogger Dashboard you must create a new static page. Because your sitemap will be visible in a static page. click Pages tab from left menu of blogger dashboard and click New page to create a new static page. 

Step #3: By default, you will land on Compose view mode of your newly created static page, so click on HTML view to add the sitemap widget script. 

Remember that if you place the CSS, HTML and jQuery code in Compose view then your widget script will not work. So, you must switch to HTML view. 

Create Blogger Sitemap & Add to Google

Step #4: Write Page Title as Sitemap or Table of Content in page title field. 

Step #5: Now copy the Sitemap Code block from below and paste is in your newly created static page. But after pasting the script do little Customization.

Just replace the https://bloggerspice.com/ with your blog URL


<div class="spicetab" id="spicetab"></div> <script> var tabbedTAB={blogUrl:"https://bloggerspice.com/",containerId:"spicetab",activeTab:1,showDates:!0,showSummaries:!1,numChars:200,showThumbnails:!0,thumbSize:60,noThumb:"data:image/png;base64,iVBORw0KGgoAAAANSUhEUgAAAAEAAAABCAIAAACQd1PeAAAAA3NCSVQICAjb4U/gAAAADElEQVQImWOor68HAAL+AX7vOF2TAAAAAElFTkSuQmCC",monthNames:["Jan","Feb","Mar","Apr","May","Jun","Jul","Aug","Sep","Oct","Nov","Dec"],newTabLink:!0,maxResults:99999,preload:0,sortAlphabetically:!0,showNew:7,newText:' &ndash; <em style="color:#ff0000;">New</em>'}; !function(a,b){var c=(new Date).getTime(),d={blogUrl:"https://bloggerspice.com",containerId:"spicetab",activeTab:1,showDates:!1,showSummaries:!1,numChars:200,showThumbnails:!1,thumbSize:40,noThumb:"data:image/png;base64,iVBORw0KGgoAAAANSUhEUgAAAAEAAAABCAIAAACQd1PeAAAAA3NCSVQICAjb4U/gAAAADElEQVQImWOor68HAAL+AX7vOF2TAAAAAElFTkSuQmCC",monthNames:["Jan","Feb","Mar","Apr","May","Jun","Jul","Aug","Sep","Oct","Nov","Dec"],newTabLink:!0,maxResults:99999,preload:0,sortAlphabetically:!0,showNew:!1,newText:' &ndash; <em style="color:#ff0000;">New!</em>'};if("undefined"==typeof tabbedTAB)tabbedTAB=d;else for(var e in d)d[e]="undefined"!=typeof tabbedTAB[e]?tabbedTAB[e]:d[e];a["clickTabs_"+c]=function(a){for(var b=document.getElementById(d.containerId),c=b.getElementsByTagName("ol"),e=b.getElementsByTagName("ul")[0],f=e.getElementsByTagName("a"),g=0,h=c.length;h>g;++g)c[g].style.display="none",c[parseInt(a,10)].style.display="block";for(var i=0,j=f.length;j>i;++i)f[i].className="",f[parseInt(a,10)].className="active-tab"},a["showTabs_"+c]=function(e){for(var f=parseInt(e.feed.openSearch$totalResults.$t,10),g=d,h=e.feed.entry,i=e.feed.category,j="",l=0;l<(g.showNew===!0?5:g.showNew)&&l!==h.length;++l)h[l].title.$t=h[l].title.$t+(g.showNew!==!1?g.newText:"");h=g.sortAlphabetically?h.sort(function(a,b){return a.title.$t.localeCompare(b.title.$t)}):h,i=g.sortAlphabetically?i.sort(function(a,b){return a.term.localeCompare(b.term)}):i,j='<span class="tab-line"></span><ul class="tab-tabs">';for(var m=0,n=i.length;n>m;++m)j+='<li class="tab-tab-item-'+m+'"><a onclick="clickTabs_'+c+"("+m+');return false;" onmousedown="return false;" href="javascript:;">'+i[m].term+"</a></li>";j+="</ul>",j+='<div class="tab-content">';for(var o=0,n=i.length;n>o;++o){j+='<ol class="panel" data-category="'+i[o].term+'"',j+=o!=g.activeTab-1?' style="display:none;"':"",j+=">";for(var p=0;f>p&&p!==h.length;++p){for(var q,r=h[p],s=r.published.$t,t=g.monthNames,u=r.title.$t,v=("summary"in r&&g.showSummaries===!0?r.summary.$t.replace(/<br *\/?>/g," ").replace(/<.*?>/g,"").replace(/[<>]/g,"").substring(0,g.numChars)+"&hellip;":""),w=("media$thumbnail"in r&&g.showThumbnails===!0?'<img class="thumbnail" style="width:'+g.thumbSize+"px;height:"+g.thumbSize+'px;" alt="" src="'+r.media$thumbnail.url.replace(/\/s\d(\-c)?\//,"/s"+g.thumbSize+"-c/")+'"/>':'<img class="thumbnail" style="width:'+g.thumbSize+"px;height:"+g.thumbSize+'px;" alt="" src="'+g.noThumb.replace(/\/s\d(\-c)?\//,"/s"+g.thumbSize+"-c/")+'"/>'),x=r.category||[],y=g.showDates?'<time datetime="'+s+'" title="'+s+'">'+s.substring(8,10)+" "+t[parseInt(s.substring(5,7),10)-1]+" "+s.substring(0,4)+"</time>":"",z=0,A=r.link.length;A>z;++z)if("alternate"===r.link[z].rel){q=r.link[z].href;break}for(var B=0,C=x.length;C>B;++B){var D=g.newTabLink?' target="_blank"':"";x[B].term===i[o].term&&(j+='<li title="'+x[B].term+'"',j+=g.showSummaries?' class="bold"':"",j+='><a href="'+q+'"'+D+">"+u+y+"</a>",j+=g.showSummaries?'<span class="summary">'+w+v+'<span style="display:block;clear:both;"></span></span>':"",j+="</li>")}}j+="</ol>"}j+="</div>",j+='<div style="clear:both;"></div>',b.getElementById(g.containerId).innerHTML=j,a["clickTabs_"+c](g.activeTab-1)};var f=b.getElementsByTagName("head")[0],g=b.createElement("script");g.src=d.blogUrl.replace(/\/+$|[\?&#].*$/g,"")+"/feeds/posts/summary?alt=json-in-script&max-results="+d.maxResults+"&orderby=published&callback=showTabs_"+c,"onload"!==d.preload?a.setTimeout(function(){f.appendChild(g)},d.preload):a.onload=function(){f.appendChild(g)}}(window,document); </script> <style scoped="" type="text/css"> .spicetab{border-radius:15px;margin:0 auto;position:relative;opacity: .9;background:linear-gradient(90deg, rgb(169, 108, 232), rgb(0, 115, 183));background-size:400% 400%;animation:Gradient 15s ease infinite} .spicetab .loading{display:block;padding:2px 12px;color:#fff} .spicetab ul,.spicetab ol,.spicetab li{list-style:none;color: #fff; margin:0;padding:0} .spicetab .tab-tabs{width:20%;float:left} .spicetab .tab-tabs li a{display:block;overflow:hidden;color:#fff;text-decoration:none;padding:12px;font-size:13px;transition:all .3s} .spicetab .tab-tabs li a:hover{background-color:rgba(0,0,0,0.05)} .spicetab .tab-tabs li a.active-tab{background:rgba(0,0,0,0.05);position:relative;z-index:5;margin:0 -1px 0 0} .spicetab .tab-content,.spicetab .tab-line{width:80%;float:right;background-color:#fff;box-sizing:border-box} .spicetab .tab-line{float:none;display:block;position:absolute;top:0;right:0;bottom:0} .spicetab .panel{position:relative;z-index:5} .spicetab .panel li a{text-decoration: none;color:#737373;display:block;position:relative;font-weight:500;font-size:14px;padding:6px 12px;overflow:hidden} .spicetab .panel li time{display:block;font-weight:bold;font-size:11px;color:#4285f4;float:right} .spicetab .panel li .summary{display:block;padding:10px 12px 10px;font-size:13px} .spicetab .panel li .summary img.thumbnail{float:left;display:block;margin:5px 8px 0 0;width:72px;height:72px;background-color:#fafafa} .spicetab .panel li{background-color:#f9f9f9;margin:0} .spicetab .panel li:nth-child(even){background-color:#fff} .spicetab .panel li a:hover,.spicetab .panel li a:focus,.spicetab .panel li.bold a{background-color:rgba(0,0,0,0.03);outline:none} .spicetab .panel li a em{background:#0998ce;color:#fff!important;font-style:initial;font-size:11px;margin:0 0 0 5px;padding:2px 10px;border-radius:22px} .spicetab .panel li:before{display:none} @-webkit-keyframes Gradient{0%{background-position:0% 50%}50%{background-position:100% 50%}100%{background-position:0% 50%}} @-moz-keyframes Gradient{0%{background-position:0% 50%}50%{background-position:100% 50%}100%{background-position:0% 50%}} @keyframes Gradient{0%{background-position:0% 50%}50%{background-position:100% 50%}100%{background-position:0% 50%}} @media (max-width:768px){.spicetab .tab-tabs,.spicetab .tab-content{overflow:hidden;width:auto;float:none;display:block}.spicetab .tab-tabs li{display:inline;float:left}.spicetab .tab-tabs li a.active-tab{background-color:rgba(64,64,64,0.1)}.spicetab .tab-content{border:none}.spicetab .tab-line,.spicetab .panel li time{display:none}} </style>

Step #6: Finally hit the Publish button. To check the sitemap, visit your newly created page. 

You will see a beautiful animated sitemap. 

Just click on different tab to visit the contents by specific Blog label or categories. It will work smoothly. 

Optional Feature to add to Run your Sitemap 

If you see that your site map is not running, then there is a possibility of missing jQuery library or you are using old version of jQuery file. So, you must add jQuery file in your Blogger theme. 

However, most of the blogger them include jQuery library to run different JavaScript based widget. 

To add the JavaScript library in your blog just follow the below steps. 

Step #1: Login to your Blogger account and visit the Dashboard 

Step #2: Click Theme tab from left vertical menu and click Edit HTML 

Step #3: Now place below JavaScript file between <head> and <head/> 

<script src='https://ajax.googleapis.com/ajax/libs/jquery/2.1.3/jquery.min.js'></script>

Step #4: Finally click Save theme button from the top. 

Now check your blogger sitemap that it should work flawlessly. 

I hope this sitemap will maximize your benefit for your blog. If you face any trouble just leave comment below, I will try to help you.

How to Create Email Newsletter Widget for Blogger?


If you want to add a newsletter widget in your Blogger site then you are at right place because I will share with you widget script and show you how to add email subscription feature in Blogger. 

If you want to take your blog to the next level, you must have to grow your audience and for growing audience I hardly recommend you to use newsletter subscription feature. Wordpress platform has ton of plugins to add subscription feature, but for Blogger options seem to be inadequate and we have to do everything manually. 


How to add opt-in widget in Blogger?

Beside of newsletter service you have to use email automation service to build your Blog audience. There are many email automation service provider over the net aong them eSputnik perform well with flexible and affordable plan. eSputnik is a Marketing Automation Service for ecommerce that helps you to manage multichannel messaging campaigns and automate them easily. It's made to embody the toughest ideas of enterprise level solutions in very clear way for everyone.

Opt-in or Email Newsletter Widget is very important for list building. For growing your blog audience steadily you must build your email list. Many blogger think that this is not so important but trust me there are thousands of Bloggers are making money through list building. 

Through your blogging list your can do several things. Like 
  1. It will increase your Blog pageviews. 
  2. This will help you to grow your ad revenue. 
  3. It will help to communicate with specific readers through email easily. 
  4. You can sell your affiliated product within your list. 
  5. If you have paid e-course then you can easily sell it among your subscriber. 
So this seems to me that list building can help us to grow blog traffic, as well as it helps to make money online. 

Features of this custom opt-in widget 

  1. The main features of this email subscriber widget are as follows: 
  2. Custom Text can be add 
  3. You can show the last month’s total page views manually. 
  4. Email subscription box will open in a separate page. 
  5. Any newsletter service can be use with this widget. 
  6. You can attract visitors through this stunning opti-in widget. 

Why Should You Use Popup Newsletter widget? 

Blogger Platform users think that we can only use Feedburner widget in blogger site. But indeed we can use almost all types of Email Newsletter services in Blogger including RSS campaign. Recently most of the opt-in service provider supports blogger platform. You can have a look at below email-newsletter service provider list. 
You can use opt-in widget directly from the above service provider. But if you concern about your page loading speed then you may try my widget which will help you to collect subscriber without affecting your website loading speed. 

All you need to do just get the subscription form page URL from your newsletter service provider and after that you will able to add the URL with this widget. I am using Mailerlite newsletter service, because it provides free auto responder and you can use mailerlite and get the subscription form page URL. 

Steps to Create an Email Newsletter Widget for Blogger 

This opt-in works really well on Blogger, I tested it on my blog and you’ll be surprised how easy it is! Let’s get started to add this widget in our blog! 

I assume that you have got your newsletter page URL. You can check my list building URL. 
  • https://app.mailerlite.com/webforms/landing/p1a8s6 
Your newsletter form page URL also would be like above. Alternatively if you wish you can use your Feedburner URL. Now it’s time to add the widget in your Blogger blog. 

Step #1: Log in to your Blogger account and Go to your Blogger Dashboard 

Step #2: Go to your Layout tab. 

Step #3: Click on "Add a Gadget" from sidebar then select "HTML/JavaScript" Widget. 

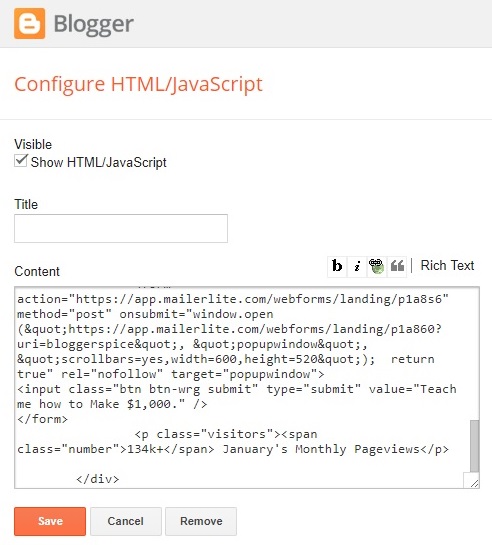
Step #4: Now Copy the below code and Paste it in "HTML/JavaScript" Gadget. 

<style>
.widget-optin{width:95%; background:#fbfcfd;text-align:center;border:solid #f2f2f2 1px;padding:10px 20px;font-size:14px;line-height:1.714285714286em;letter-spacing:.25px}
.red{color:#00AEEF!important}
.widget-optin .title{font-size:28px;line-height:1.285714285714em;font-weight:600;margin:0 auto .5em auto;max-width:320px}
.widget-optin .description{font-size:24px;line-height:calc(32/24);font-weight:300;max-width:225px;margin:0 auto .8333333333333em auto}
.btn{display:inline-block;text-transform:uppercase;font-size:20px;line-height:1.45em;font-weight:600;padding:25px 55px;border:none;outline:none;cursor:pointer;text-decoration:none!important;max-width:100%;white-space:normal}
.widget-optin .btn{border:3px double #FFF;margin:0 0 30px 0;padding:10px 15px}
.widget .btn{font-size:16px;line-height:1.75em;padding-top:10px;padding-bottom:10px;min-width:220px}
.btn-wrg{background-color:#00AEEF;color:#fff}
.widget-optin .number{display:block;font-size:30px;line-height:(43/30);color:#43464b;margin:0 0 .25em 0}
.widget-optin .visitors{text-transform:uppercase;font-weight:600;color:#a0a3a7}
</style>


<div class="widget-optin">
<p class="red title">Ways To Make An Extra <span> $1,000</span> A Month </p>
<p class="description">Learn how to get 100k visitors a month.</p>
<form action="https://app.mailerlite.com/webforms/landing/p1a8s6" method="post" onsubmit="window.open (&quot;https://app.mailerlite.com/webforms/landing/p1a860?uri=bloggerspice&quot;, &quot;popupwindow&quot;, &quot;scrollbars=yes,width=600,height=520&quot;); return true" rel="nofollow" target="popupwindow">
<input class="btn btn-wrg submit" type="submit" value="Teach me how to Make $1,000." />
</form>
<p class="visitors"><span class="number">134k+</span> January's Monthly Pageviews</p>

</div>


If you are using latest Blogger version then you will see an extra option “Show HTML/JavaScript”. Just put tick on check box.


How to Create Email Newsletter Widget for Blogger?


Step #5: Now hit the Save button. 

Customization 

  • Change the text according to your own words or keep unchange. 
  • Replace https://app.mailerlite.com/webforms/landing/p1a8s6 URL with your newsletter service URL. You will find this URL 2 times, so replace both. 
I hope this widget will help you to build your newsletter rapidly. I experienced for myself that this opt-in widget really brought me subscribers. 

It is really worth to try it out! If you have any question, feel free to ask me through comment section. Thank you.

How to add Valentine's Day Falling Hearts effect in Blogger?

On valentine's day occasions we see many website and Blog shows falling heart effect over the webpage. This is look like heart is falling from the top to bottom. 

This is really romantic to see this effect on special valentine's occasion. This feature add a romantic theme in a website.

We knows 14th February is valentine's day and reaching soon, so why don't you show some love to your Blog visitors and give a cordial welcome by adding falling heart effect.

Falling Hearts on Your Blog - Valentines Day Special

I think you have already planned something to do special to spread love among your blog readers, then this valentine's falling hearts effect will add extra spice and valentine's theme on your website. This trick will display falling hearts across your blog magnificently.
Valentine Heart Falling Effect For Blogger
Party Style Falling Heart

But when should you integrate this widget in your Blog!! Most of the people think this feature should add on Valentine's day only and you are thinking the same but in real you can use this widget from 7th February in your Blogger site. There are a simple reason behind this. Just have a look on this small romantic cheat sheet. 


Date Occasions
7 February Rose Day
8 February Propose Day
9 February Chocolate Day
10 February Teddy Day
11 February Promise Day
12 February Hug Day
13 February Kiss Day
14 February Valentine’s Day


 How To Add Falling Hearts In Blogger Blog For Valentines Day
Pretty Simple Style Falling Heart

I hope the above info would be pretty handy for you. Anyway now I'm going to share the tutorial about how to add Valentine's Day Falling Hearts effect in Blogger site? Just go through the below steps:
Add Valentine Day Special Falling Heart Widget in Blogger
Animated Falling Heart Style


Step #1: Log in to your Blogger Account and Go to your Blogger Dashboard


Step #2: Click on Now click on  Template -> Edit HTML

Step #3: Now find the </body>  By Pressing Ctrl+F (Windows) or CMD+F (Mac)

Step #4: Copy the below code and Paste the code above/before </body>


<script type='text/javascript'>

//<![CDATA[

function iecompattest(){return document.compatMode&&document.compatMode!="CSS1Compat"?document.documentElement:document.body}function bsheartIE_NS6(){doc_width=ns6up?window.innerWidth-10:iecompattest().clientWidth-10;doc_height=window.innerHeight&&bsheartdistance=="windowheight"?window.innerHeight:ie4up&&bsheartdistance=="windowheight"?iecompattest().clientHeight:ie4up&&!window.opera&&bsheartdistance=="pageheight"?iecompattest().scrollHeight:iecompattest().offsetHeight;for(i=0;i<no;++i){yp[i]+=sty[i];if(yp[i]>doc_height-50){xp[i]=Math.random()*(doc_width-am[i]-30);yp[i]=0;stx[i]=.02+Math.random()/10;sty[i]=.7+Math.random()}dx[i]+=stx[i];document.getElementById("dot"+i).style.top=yp[i]+"px";document.getElementById("dot"+i).style.left=xp[i]+am[i]*Math.sin(dx[i])+"px"}bshearttimer=setTimeout("bsheartIE_NS6()",10)}function hidebsheart(){if(window.bshearttimer)clearTimeout(bshearttimer);for(i=0;i<no;i++)document.getElementById("dot"+i).style.visibility="hidden"}var bsheartsrc="IMAGE URL HERE";var no=15;var hidebshearttime=0;var bsheartdistance="pageheight";var ie4up=document.all?1:0;var ns6up=document.getElementById&&!document.all?1:0;var dx,xp,yp;var am,stx,sty;var i,doc_width=800,doc_height=600;if(ns6up){doc_width=self.innerWidth;doc_height=self.innerHeight}else if(ie4up){doc_width=iecompattest().clientWidth;doc_height=iecompattest().clientHeight}dx=new Array;xp=new Array;yp=new Array;am=new Array;stx=new Array;sty=new Array;bsheartsrc=bsheartsrc.indexOf("bloggerspice.com")!=-1?" IMAGE URL HERE ":bsheartsrc;for(i=0;i<no;++i){dx[i]=0;xp[i]=Math.random()*(doc_width-50);yp[i]=Math.random()*doc_height;am[i]=Math.random()*20;stx[i]=.02+Math.random()/10;sty[i]=.7+Math.random();if(ie4up||ns6up){if(i==0){document.write('<div id="dot'+i+'" style="POSITION: absolute;Z-INDEX: '+i+';VISIBILITY: visible;TOP: 15px;LEFT: 15px;"><a href="http://bloggerspice.com"><img src=\''+bsheartsrc+'\' border="0"></a></div>')}else{document.write('<div id="dot'+i+'" style="POSITION: absolute;Z-INDEX: '+i+";VISIBILITY: visible;TOP: 15px;LEFT: 15px;\"><img src='"+bsheartsrc+'\' border="0"></div>')}}}if(ie4up||ns6up){bsheartIE_NS6();if(hidebshearttime>0)setTimeout("hidebsheart()",hidebshearttime*1e3)}

//]]>

</script>


Step #5: We have added the main script in our Blogger template. Now it's time to spice up. I have added here 10 style falling heart image. Some are animated and some are static. You can simply change the heart style by changing images. Now please locate IMAGE URL HERE inside the above JavaScript, you will find this text 2 times so replace both IMAGE URL HERE by any image from below. For quick loading the widget image please save the images from below and host those images in your Blogger site and after that use the Image URL inside the JavaScript.

Add Valentine Day Special Falling Heart Widget in Blogger

Step #6: Finally hit the Save template button.


Now check your Blogger template and see a beautiful falling heart effect. that's really romantic and now your Blogger template tailored with valentine's them. I hope your Blog visitors will love this widget and get a taste of festive theme. Thank you.

How to Add Multi-Column Theme Featured Content in Blogger?

You have already noticed in WordPress theme selling sites they frequently display theme features within multiple boxes. Generally it shows side by side in 2 columns. In many website this job done by using simple image.

But if you use large image then it can affect your content loading speed. In Blogger site this is more difficult to create multi-box inside Blog post.

html-cod-for-columns

Even in the most popular web design selling site themeforest you will see they are simply using large image to display theme or template features inside content body.
How to use column shortcodes in Blogger?
Multi-Column Theme Featured Content in Blogger Blog Post

But I will show you a simple way to create multi-Column Theme or template Featured Content in Blogger Blog post. However to make it more attractive I will use FontAwesome icons. Please follow the guidelines to integrate multi-column Theme Featured Content in Blogger Blog post. 

Step #1: Log in to your Blogger Account and go to Dashboard

Step #2: From vertical options click on Template ->Edit HTML->

Step #3: Now Find this code ]]></b:skin> by pressing Ctrl+F (Windows) or CMD+F (Mac)

Step #4: (Optional) If your Blogger template already containing FontAwesome file then simply skip this step, If not yet integrated then add the below FontAwesome script before/above </head>

<link href='//netdna.bootstrapcdn.com/font-awesome/4.7.0/css/font-awesome.min.css' rel='stylesheet' type='text/css'/>

Step #5: Once you added the FontAwesome script, copy the below code block and Paste it code Before/above ]]></b:skin>


/* Trick by www.bloggerspice.com */


#themefeatures{text-align:left;padding-top:20px;padding-bottom:10px;border-bottom:3px solid #FAFBF9;border-top:3px solid #FAFBF9}


.themefeature{width:44%;display:inline-block;vertical-align:top;margin-right:10px;margin-left:10px;margin-bottom:15px}


.themefeaturetext{margin-left:70px;margin-top:-40px;float:left}


.themefeature:nth-child(2n+2){margin-right:0}


.themefeature .fa{margin-left:10px;float:left;font-size:38px;color:#FA5356}


.themefeature h2{color:#243746;font-size:22px;margin-bottom:20px}


Step #6: You can simply change the multi-column icon color by altering color:#FA5356  color code. Once you have change the color code click Save template from the top.

We have completed the CSS Part that will help to tweak your multi-column appearance. But without HTML this is pointless. HTML script you have to add each time on specific post where you want to display the theme or template features. Please follow the instruction from below. 

Step #1: Go to your Blogger Dashboard Click Posts -> New post you will head to post editor.

Step #2: Now switch to HTML editor from Compose editor. Here you should add the widget code.

How to Add Multi-Column Theme Featured Content in Blogger?

Step #3: Copy the HTML script from below. Remember that in some blogger site after adding script if you switch to Compose editor and publish the post then script can be break. So first write your post in Compose editor and then switch to HTML editor and add the widget script.


<div id="themefeatures">


<div class="themefeature">


<i class="fa fa-check-square-o"></i>


<div class="themefeaturetext">

<h2>

We continuously test our templates so you will know they are always compatible with the latest version of Blogger Platform.</div>


Compatible with Latest Blogger</h2>

</div>

<div class="themefeaturetext">

<!-- End Themefeature -->


<div class="themefeature">


<i class="fa fa-code"></i>

<h2>

<!-- End Themefeature -->

No Encrypted Scripts</h2>


All our Premium template will be deliver to you without Encrypted Scripts</div>

</div>
<div class="themefeature">
<i class="fa fa-file-o"></i>

We have written detailed documentation which guides you through the process of using your new template.</div>


<div class="themefeaturetext">

<h2>

Extensive Documentation Files</h2>

</div>
<!-- End Themefeature -->

<i class="fa fa-support"></i>

<div class="themefeature">

<!-- End Themefeature -->


<div class="themefeaturetext">

<h2>

We have customer support system, if you ever need any help with your template.</div>

Customer Support</h2>

<div class="themefeature">

</div>

</div>


<i class="fa fa-laptop"></i>

<div class="themefeaturetext">

Fully Responsive Design</h2>

<h2>

All our templates are responsive so they look great no matter what size screen you are viewing them on.</div>


We include just the right amount of useful widget areas and sidebars so you can place your content.</div>


<!-- End Themefeature -->


<div class="themefeature">


<i class="fa fa-list"></i>

<div class="themefeaturetext">

</div>

<h2>
Widgetized Areas</h2>

<div class="themefeature">

<!-- End Themefeature -->

<!-- End Themefeature by www.bloggerspice.com -->


<i class="fa fa-cogs"></i>

<div class="themefeaturetext">

Template Customizer</h2>

<h2>

Upload a logo, change your theme colors, change footer text and add tracking scripts all in real-time.</div>

</div>
<div class="themefeature">

<div class="themefeature">


<i class="fa fa-font"></i>

<div class="themefeaturetext">

We include FontAwesome Icons &amp; Hundreds of Google Fonts to Choose from to customize your site.</div>

<h2>
Icons and Fonts</h2>

<i class="fa fa-columns"></i>

</div>
<!-- End Themefeature -->

<div class="themefeaturetext">


<div class="themefeaturetext">

<h2>
Custom Widgets</h2>

We include our own widgets for Social Media, Displaying Advertising and showing off your Flickr images.</div>

</div>
<!-- End Themefeature -->
<div class="themefeature">
<i class="fa fa-globe"></i>
<h2>

</div>


Localized and Multi Language Compatible</h2>


All our template are fully localized so you can translate them into any language you choose.</div>

</div>

<!-- End Themefeature -->


Step #4: Finally hit the Publish button to make it live.


Check your Blog post now and see beautiful multi-column theme featured in your Blog post. Some pre-caution you should take after adding this widget. In future if you edit your post then you must edit your post in HTML editor and update it in HTML editor. This multi-column featured table simply crushes if you update your content in Compose editor.

I hope you would like this widget and you can discuss below for any further help. I would try to help you with my level best. Thank you.

Automatically Display Any Affiliate and Adsense Ads in the Middle of Blog Post?

In WordPress platform we often see advertisement can be display in different places. Generally it can be done by the help of Plugins. 

And Plugins helps to circulate the ad place and display in different place. This is one of the most effective way to increase Ads revenue. And this strategy works best to increase ad revenue.

In Blogger platform hasn't any opportunity to use plugins mobilize ad placement trick. But we can use JavaScript to display ads at the middle of the Blog post that can increase our ad revenue. Most of the returning Blog readers become ad blind, because they know where ads has placed in your site and they avoid that place.

But by using this widget you can display ads in the middle of the Blog posts and readers will click on ads naturally.

Automatically Display Any Affiliate Ads in the Middle of Blog Post?

Previously I have shared a widget where we can display AdSense ads anywhere inside of a Blogpost. But that widget you have to use manually, because while you make post you have to place manual code <!-- adsense --> like this, where you want to display ads. Many users may not like this widget because of manual works.

So to get ride from that you can use this automatic affiliate ad display widget. Even now you can display any widget in the middle of Blog Post. This widget has several features, those are as follows:
  • Display ads at the middle of the Blog Post.
  • You don't have to manually put code.
  • This will automatically search the place to display ads.
  • You can display multiple ad units.
  • Any widget like related post widget can be display at the middle of the Blog posts.
  • You can easily  remove the widget.
Sounds great! I hope you are pretty excited to integrate this widget in your Blogger site. So let's proceed to the tutorial. Please take a backup of your Blogger template before proceed. After that go through the below steps-by-steps walk through.


Step #1: Log in to your Blogger Account and go to Dashboard

Step #2: From vertical options click on Theme ->Edit HTML->

Step #3: Instantly locate <data:post.body/>  by Pressing  Ctrl+F (Windows) or CMD+F (Mac) 


You will find this code  <data:post.body/>  3/4 times, Please go for second one.

Step #4: Once you find it then replace <data:post.body/> code by below script.

<div expr:id='&quot;adbox&quot;+ data:post.id'/>
<div style='clear:both;text-align:center;margin:15px 0 15px 0'>
<!-- Place Your Ad Code here -->
</div>
<div expr:id='&quot;adsbox&quot;+ data:post.id'><p><data:post.body/></p></div>
<script type='text/javascript'>
var obj0=document.getElementById(&quot;adbox<data:post.id/>&quot;);var obj1=document.getElementById(&quot;adsbox<data:post.id/>&quot;);var s=obj1.innerHTML;var t=s.substr(0,s.length/2);var r=t.lastIndexOf(&quot;&lt;br&gt;&quot;);if(r&gt;0){obj0.innerHTML=s.substr(0,r);obj1.innerHTML=s.substr(r+16);}
</script>
Step #5: Please replace line with your affiliate ads, AdSense or widget code. And click "Save template” from the HTML editor.

Note that for placing AdSense ads you must parse the script first. Simple use are Parser to use AdSense code in the widget.

You can check your Blog post now and see ads has started display in the middle of the Blog Post automatically.

A Simple Solution

If your Blog already have many posts then you may see some problem. Some broken script will appear at the bottom of the ad banner. To fix this issue simply make a gap between ad banner and texts in Blog post editor. After that see the preview, if you see broken script is not appearing then simply publish or Update the post.

If you have any query regarding this widget then simply feel free to write a comment below. I will try to get connect with you soon. Thank you.

How to Decorate your Blogger Blog with Cute Dynamic Snow Fall Effect?

You might wonder by visiting some Blogs that decorate with cute snow is fall effect. Those are looking really nice and lively. 

Generally in Christmas occasion and Winter season people use this effect. Just imagine that Snowflakes' falling slowly and endlessly all over your Blog and your Blog visitors will feel so happy by watching this effect. 

A positive side of this effect is more visitors will get engage with your Blog site.

add Snow Fall Effect in blogger

I know you are pretty excited to add such a cool effect  in your Blog. Don't worry I will share the script below for adding snow fall effect in your Blog. Even you don't need any coding skills.

Features of this Snowfall effect?

This widget is really simple but pretty and interesting. And you can customize according to your own. In addition there are some features of this widget are as follows:
  • This is extremely easy to setup in your Blog.  It will take less than 5 minutes to install.
  • It doesn't affect your site loading time. As well as it won't conflict with other widget.
  • Easily Customizable the snowflakes size, shape, speed, number, color, and appearance
  • You don't need to use any hosted JavaScript file on your Blog that load from other third-party site.
  • Easily removable widget, whenever you want you can remove the effect.

Adding Jquery Library (Optional)

This is an optional task. Majority of Blogger template containing jaquery file. But if you Blogger template is not containing Jquery file the you can add the below file above closing header section.

Step #1: Log in to your Blogger Account and Go to your Blogger Dashboard

Step #2: Click on Now click on -> Template -> Edit HTML

Step #3:
 Now find the </head> By Pressing Ctrl+F (Windows) or CMD+F (Mac)

Step #4: Copy the below code and Paste the code above/before </head>


<script src='https://ajax.googleapis.com/ajax/libs/jquery/1.7.1/jquery.min.js' type='text/javascript'/>

Step #5: Finally hit the Save template

That's it you have successfully added the Jquery library in your Blog. If your template already containing this file and any updated version of Jquery file then simply skip to the next step.


How to add Dynamic Snow Fall Effect?

Please go through the below steps to add Cute Dynamic Snow Fall Effect in your Blogger template.

Step #1: Log in to your Blogger Account and Go to your Blogger Dashboard

Step #2: Click on Now click on -> Template -> Edit HTML

Step #3: Now find the </body> By Pressing Ctrl+F (Windows) or CMD+F (Mac)


Step #4: Copy the below code and Paste the code above/before </body>


<script type='text/javascript'>

//<![CDATA[

var snowStorm=(function(window,document){this.autoStart=true;this.excludeMobile=false;this.flakesMax=128;this.flakesMaxActive=64;this.animationInterval=33;this.useGPU=true;this.className=null;this.excludeMobile=true;this.flakeBottom=null;this.followMouse=true;this.snowColor='#fff';this.snowCharacter='&bull;';this.snowStick=true;this.targetElement=null;this.useMeltEffect=true;this.useTwinkleEffect=false;this.usePositionFixed=false;this.usePixelPosition=false;this.freezeOnBlur=true;this.flakeLeftOffset=0;this.flakeRightOffset=0;this.flakeWidth=8;this.flakeHeight=8;this.vMaxX=5;this.vMaxY=4;this.zIndex=0;var storm=this,features,isIE=navigator.userAgent.match(/msie/i),isIE6=navigator.userAgent.match(/msie 6/i),isMobile=navigator.userAgent.match(/mobile|opera m(ob|in)/i),isBackCompatIE=(isIE&&document.compatMode==='BackCompat'),noFixed=(isBackCompatIE||isIE6),screenX=null,screenX2=null,screenY=null,scrollY=null,docHeight=null,vRndX=null,vRndY=null,windOffset=1,windMultiplier=2,flakeTypes=6,fixedForEverything=false,targetElementIsRelative=false,opacitySupported=(function(){try{document.createElement('div').style.opacity='0.5';}catch(e){return false;}

return true;}()),didInit=false,docFrag=document.createDocumentFragment();features=(function(){var getAnimationFrame;function timeoutShim(callback){window.setTimeout(callback,1000/(storm.animationInterval||20));}
var _animationFrame=(window.requestAnimationFrame||window.webkitRequestAnimationFrame||window.mozRequestAnimationFrame||window.oRequestAnimationFrame||window.msRequestAnimationFrame||timeoutShim);getAnimationFrame=_animationFrame?function(){return _animationFrame.apply(window,arguments);}:null;var testDiv;testDiv=document.createElement('div');function has(prop){var result=testDiv.style[prop];return(result!==undefined?prop:null);}

if(storm.usePixelPosition||targetElementIsRelative){o.style.left=(x-storm.flakeWidth)+'px';o.style.top=(y-storm.flakeHeight)+'px';}else if(noFixed){o.style.right=(100-(x/screenX*100))+'%';o.style.top=(Math.min(y,docHeight-storm.flakeHeight))+'px';}else{if(!storm.flakeBottom){o.style.right=(100-(x/screenX*100))+'%';o.style.bottom=(100-(y/screenY*100))+'%';}else{o.style.right=(100-(x/screenX*100))+'%';o.style.top=(Math.min(y,docHeight-storm.flakeHeight))+'px';}}};this.events=(function(){var old=(!window.addEventListener&&window.attachEvent),slice=Array.prototype.slice,evt={add:(old?'attachEvent':'addEventListener'),remove:(old?'detachEvent':'removeEventListener')};function getArgs(oArgs){var args=slice.call(oArgs),len=args.length;if(old){args[1]='on'+args[1];if(len>3){args.pop();}}else if(len===3){args.push(false);}

var localFeatures={transform:{ie:has('-ms-transform'),moz:has('MozTransform'),opera:has('OTransform'),webkit:has('webkitTransform'),w3:has('transform'),prop:null},getAnimationFrame:getAnimationFrame};localFeatures.transform.prop=(localFeatures.transform.w3||localFeatures.transform.moz||localFeatures.transform.webkit||localFeatures.transform.ie||localFeatures.transform.opera);testDiv=null;return localFeatures;}());this.timer=null;this.flakes=[];this.disabled=false;this.active=false;this.meltFrameCount=20;this.meltFrames=[];this.setXY=function(o,x,y){if(!o){return false;}
return args;}
function apply(args,sType){var element=args.shift(),method=[evt[sType]];if(old){element[method](args[0],args[1]);}else{element[method].apply(element,args);}}
function addEvent(){apply(getArgs(arguments),'add');}
function removeEvent(){apply(getArgs(arguments),'remove');}
return{add:addEvent,remove:removeEvent};}());function rnd(n,min){if(isNaN(min)){min=0;}
return(Math.random()*n)+min;}
function plusMinus(n){return(parseInt(rnd(2),10)===1?n*-1:n);}

docHeight=document.body.offsetHeight;screenX2=parseInt(screenX/2,10);};this.resizeHandlerAlt=function(){screenX=storm.targetElement.offsetWidth-storm.flakeRightOffset;screenY=storm.flakeBottom||storm.targetElement.offsetHeight;screenX2=parseInt(screenX/2,10);docHeight=document.body.offsetHeight;};this.freeze=function(){if(!storm.disabled){storm.disabled=1;}else{return false;}

this.randomizeWind=function(){var i;vRndX=plusMinus(rnd(storm.vMaxX,0.2));vRndY=rnd(storm.vMaxY,0.2);if(this.flakes){for(i=0;i<this.flakes.length;i++){if(this.flakes[i].active){this.flakes[i].setVelocities();}}}};this.scrollHandler=function(){var i;scrollY=(storm.flakeBottom?0:parseInt(window.scrollY||document.documentElement.scrollTop||(noFixed?document.body.scrollTop:0),10));if(isNaN(scrollY)){scrollY=0;}
if(!fixedForEverything&&!storm.flakeBottom&&storm.flakes){for(i=0;i<storm.flakes.length;i++){if(storm.flakes[i].active===0){storm.flakes[i].stick();}}}};this.resizeHandler=function(){if(window.innerWidth||window.innerHeight){screenX=window.innerWidth-16-storm.flakeRightOffset;screenY=(storm.flakeBottom||window.innerHeight);}else{screenX=(document.documentElement.clientWidth||document.body.clientWidth||document.body.scrollWidth)-(!isIE?8:0)-storm.flakeRightOffset;screenY=storm.flakeBottom||document.documentElement.clientHeight||document.body.clientHeight||document.body.scrollHeight;}
storm.timer=null;};this.resume=function(){if(storm.disabled){storm.disabled=0;}else{return false;}
storm.timerInit();};this.toggleSnow=function(){if(!storm.flakes.length){storm.start();}else{storm.active=!storm.active;if(storm.active){storm.show();storm.resume();}else{storm.stop();storm.freeze();}}};this.stop=function(){var i;this.freeze();for(i=0;i<this.flakes.length;i++){this.flakes[i].o.style.display='none';}

this.o.style.width=storm.flakeWidth+'px';this.o.style.height=storm.flakeHeight+'px';this.o.style.fontFamily='arial,verdana';this.o.style.cursor='default';this.o.style.overflow='hidden';this.o.style.fontWeight='normal';this.o.style.zIndex=storm.zIndex;docFrag.appendChild(this.o);this.refresh=function(){if(isNaN(s.x)||isNaN(s.y)){return false;}

storm.events.remove(window,'scroll',storm.scrollHandler);storm.events.remove(window,'resize',storm.resizeHandler);if(storm.freezeOnBlur){if(isIE){storm.events.remove(document,'focusout',storm.freeze);storm.events.remove(document,'focusin',storm.resume);}else{storm.events.remove(window,'blur',storm.freeze);storm.events.remove(window,'focus',storm.resume);}}};this.show=function(){var i;for(i=0;i<this.flakes.length;i++){this.flakes[i].o.style.display='block';}};this.SnowFlake=function(type,x,y){var s=this;this.type=type;this.x=x||parseInt(rnd(screenX-20),10);this.y=(!isNaN(y)?y:-rnd(screenY)-12);this.vX=null;this.vY=null;this.vAmpTypes=[1,1.2,1.4,1.6,1.8];this.vAmp=this.vAmpTypes[this.type]||1;this.melting=false;this.meltFrameCount=storm.meltFrameCount;this.meltFrames=storm.meltFrames;this.meltFrame=0;this.twinkleFrame=0;this.active=1;this.fontSize=(10+(this.type/5)*10);this.o=document.createElement('div');this.o.innerHTML=storm.snowCharacter;if(storm.className){this.o.setAttribute('class',storm.className);}
this.o.style.color=storm.snowColor;this.o.style.position=(fixedForEverything?'fixed':'absolute');if(storm.useGPU&&features.transform.prop){this.o.style[features.transform.prop]='translate3d(0px, 0px, 0px)';}
storm.setXY(s.o,s.x,s.y);};this.stick=function(){if(noFixed||(storm.targetElement!==document.documentElement&&storm.targetElement!==document.body)){s.o.style.top=(screenY+scrollY-storm.flakeHeight)+'px';}else if(storm.flakeBottom){s.o.style.top=storm.flakeBottom+'px';}else{s.o.style.display='none';s.o.style.bottom='0%';s.o.style.position='fixed';s.o.style.display='block';}};this.vCheck=function(){if(s.vX>=0&&s.vX<0.2){s.vX=0.2;}else if(s.vX<0&&s.vX>-0.2){s.vX=-0.2;}
if(s.vY>=0&&s.vY<0.2){s.vY=0.2;}};this.move=function(){var vX=s.vX*windOffset,yDiff;s.x+=vX;s.y+=(s.vY*s.vAmp);if(s.x>=screenX||screenX-s.x<storm.flakeWidth){s.x=0;}else if(vX<0&&s.x-storm.flakeLeftOffset<-storm.flakeWidth){s.x=screenX-storm.flakeWidth-1;}
s.refresh();yDiff=screenY+scrollY-s.y+storm.flakeHeight;if(yDiff<storm.flakeHeight){s.active=0;if(storm.snowStick){s.stick();}else{s.recycle();}}else{if(storm.useMeltEffect&&s.active&&s.type<3&&!s.melting&&Math.random()>0.998){s.melting=true;s.melt();}

storm.targetElement.appendChild(docFrag);};this.timerInit=function(){storm.timer=true;storm.snow();};this.init=function(){var i;for(i=0;i<storm.meltFrameCount;i++){storm.meltFrames.push(1-(i/storm.meltFrameCount));}

if(storm.useTwinkleEffect){if(s.twinkleFrame<0){if(Math.random()>0.97){s.twinkleFrame=parseInt(Math.random()*8,10);}}else{s.twinkleFrame--;if(!opacitySupported){s.o.style.visibility=(s.twinkleFrame&&s.twinkleFrame%2===0?'hidden':'visible');}else{s.o.style.opacity=(s.twinkleFrame&&s.twinkleFrame%2===0?0:1);}}}}};this.animate=function(){s.move();};this.setVelocities=function(){s.vX=vRndX+rnd(storm.vMaxX*0.12,0.1);s.vY=vRndY+rnd(storm.vMaxY*0.12,0.1);};this.setOpacity=function(o,opacity){if(!opacitySupported){return false;}
o.style.opacity=opacity;};this.melt=function(){if(!storm.useMeltEffect||!s.melting){s.recycle();}else{if(s.meltFrame<s.meltFrameCount){s.setOpacity(s.o,s.meltFrames[s.meltFrame]);s.o.style.fontSize=s.fontSize-(s.fontSize*(s.meltFrame/s.meltFrameCount))+'px';s.o.style.lineHeight=storm.flakeHeight+2+(storm.flakeHeight*0.75*(s.meltFrame/s.meltFrameCount))+'px';s.meltFrame++;}else{s.recycle();}}};this.recycle=function(){s.o.style.display='none';s.o.style.position=(fixedForEverything?'fixed':'absolute');s.o.style.bottom='auto';s.setVelocities();s.vCheck();s.meltFrame=0;s.melting=false;s.setOpacity(s.o,1);s.o.style.padding='0px';s.o.style.margin='0px';s.o.style.fontSize=s.fontSize+'px';s.o.style.lineHeight=(storm.flakeHeight+2)+'px';s.o.style.textAlign='center';s.o.style.verticalAlign='baseline';s.x=parseInt(rnd(screenX-storm.flakeWidth-20),10);s.y=parseInt(rnd(screenY)*-1,10)-storm.flakeHeight;s.refresh();s.o.style.display='block';s.active=1;};this.recycle();this.refresh();};this.snow=function(){var active=0,flake=null,i,j;for(i=0,j=storm.flakes.length;i<j;i++){if(storm.flakes[i].active===1){storm.flakes[i].move();active++;}
if(storm.flakes[i].melting){storm.flakes[i].melt();}}
if(active<storm.flakesMaxActive){flake=storm.flakes[parseInt(rnd(storm.flakes.length),10)];if(flake.active===0){flake.melting=true;}}
if(storm.timer){features.getAnimationFrame(storm.snow);}};this.mouseMove=function(e){if(!storm.followMouse){return true;}
var x=parseInt(e.clientX,10);if(x<screenX2){windOffset=-windMultiplier+(x/screenX2*windMultiplier);}else{x-=screenX2;windOffset=(x/screenX2)*windMultiplier;}};this.createSnow=function(limit,allowInactive){var i;for(i=0;i<limit;i++){storm.flakes[storm.flakes.length]=new storm.SnowFlake(parseInt(rnd(flakeTypes),10));if(allowInactive||i>storm.flakesMaxActive){storm.flakes[storm.flakes.length-1].active=-1;}}
storm.randomizeWind();storm.createSnow(storm.flakesMax);storm.events.add(window,'resize',storm.resizeHandler);storm.events.add(window,'scroll',storm.scrollHandler);if(storm.freezeOnBlur){if(isIE){storm.events.add(document,'focusout',storm.freeze);storm.events.add(document,'focusin',storm.resume);}else{storm.events.add(window,'blur',storm.freeze);storm.events.add(window,'focus',storm.resume);}}

</script>

storm.resizeHandler();storm.scrollHandler();if(storm.followMouse){storm.events.add(isIE?document:window,'mousemove',storm.mouseMove);}
storm.animationInterval=Math.max(20,storm.animationInterval);storm.timerInit();};this.start=function(bFromOnLoad){if(!didInit){didInit=true;}else if(bFromOnLoad){return true;}
if(typeof storm.targetElement==='string'){var targetID=storm.targetElement;storm.targetElement=document.getElementById(targetID);if(!storm.targetElement){throw new Error('Snowstorm: Unable to get targetElement "'+targetID+'"');}}
if(!storm.targetElement){storm.targetElement=(document.body||document.documentElement);}
if(storm.targetElement!==document.documentElement&&storm.targetElement!==document.body){storm.resizeHandler=storm.resizeHandlerAlt;storm.usePixelPosition=true;}
storm.resizeHandler();storm.usePositionFixed=(storm.usePositionFixed&&!noFixed&&!storm.flakeBottom);if(window.getComputedStyle){try{targetElementIsRelative=(window.getComputedStyle(storm.targetElement,null).getPropertyValue('position')==='relative');}catch(e){targetElementIsRelative=false;}}
fixedForEverything=storm.usePositionFixed;if(screenX&&screenY&&!storm.disabled){storm.init();storm.active=true;}};function doDelayedStart(){window.setTimeout(function(){storm.start(true);},20);storm.events.remove(isIE?document:window,'mousemove',doDelayedStart);}
function doStart(){if(!storm.excludeMobile||!isMobile){doDelayedStart();}
storm.events.remove(window,'load',doStart);}
if(storm.autoStart){storm.events.add(window,'load',doStart,false);}
return this;}(window,document));

//]]>


Step #5: Finally hit the Save template. 

...Customization Guide to modify the effect
This widget script is very advance and without any flake png image this is able to display the effect. And you can customize according to your own preference.
  • animationInterval=33; for controlling the animation interval just change the value. e.g. 35.
  • followMouse=true; Use true or false.This will indicate that snow will follow the mouse or not.
  • this.snowColor='#fff'; You can change the snow color by altering the color code #fff. e.g. #ccc
  • .flakeWidth=8; This value will change the flake width. to change the widget just alter value. e.g. 10
  • .flakeHeight=8; This value will change the flake Height. to change the height just alter value. e.g. 10
  • .excludeMobile=false;If you want to disable the effect on Mobile device then simply make false to true.
I hope you will able to add snow effect in your Blogger Blog effectively. If you have anything to say then you can suggest by leaving a comment below. And don't forget to share in your social media site.